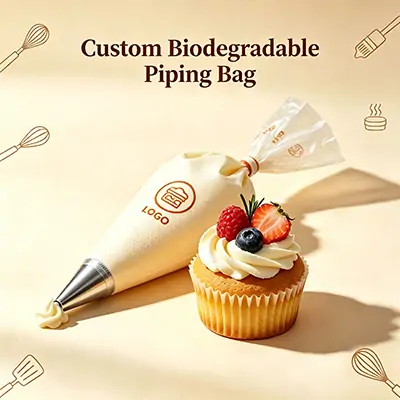
 Tired of messy frosting, uneven swirls, and decorations that don’t look like the picture? You’re not alone. The humble piping bag is the secret weapon behind every beautifully decorated cake and cupcake, but it can be intimidating for beginners.
This comprehensive guide will walk you through everything you need to know, transforming you from a novice to a confident decorator. We’ll cover the essential piping bag techniques for cake decorating, the best way to fill a piping bag without mess, and all the tips and tricks for perfect frosting.
What is a Piping Bag?
Piping Bag Types: Choosing Your Tool
-
Disposable Bags: Made of thin plastic. Best for: beginners, messy or colorful frostings (such as black or red), and quick cleanup. You just snip the end and throw it away.
-
Reusable Bags: Made of silicone, nylon, or canvas. Best for: Frequent bakers, environmental consciousness, and sturdiness. They require thorough cleaning.
-
Tipless Bags: A subtype of disposable bags. You snip the end to your desired opening size, eliminating the need for a metal tip for basic lines and dots.
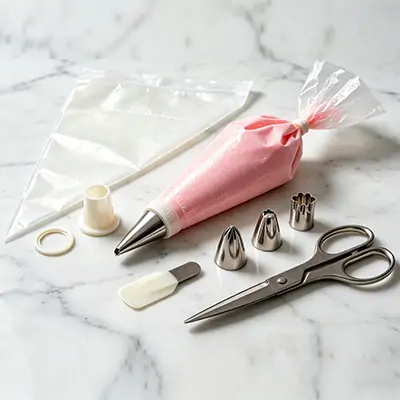
Essential Tools You’ll Need
-
Piping Bags: Choose your type.
-
Piping Tips: Small metal tips that shape the frosting. Start with a basic round tip (like #12), a star tip (like #1M), and a petal tip (like #104).
-
Coupler: A two-part plastic device that lets you change tips on a single filled bag. A must-have for multi-design cakes.
-
Scissors: For snipping bag ends.
-
Tall Glass or Cup: Your secret weapon for mess-free filling.
- Spatula
Step-by-Step: How to Use a Piping Bag for Beginners
Step 1: Prepare the Bag
-
If using a coupler, insert the base into the bag. Push it down to the tip of the bag.
-
Cut the Bag: Hold the tip or coupler base inside the bag. Using scissors, cut the bag’s tip off just enough for the coupler’s threads or the piping tip’s base to poke through. Cutting too much is a common mistake!
Step 2: Attach the Tip
-
With a Coupler: Screw the ring over the exposed threads to lock the tip in place.
-
Without a Coupler: Simply drop your chosen piping tip into the bag, letting it settle into the cut opening.
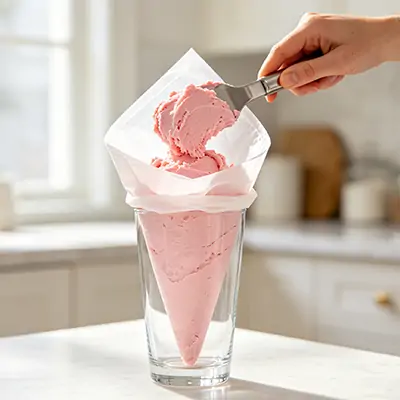
Step 3: Fill the Bag (The Mess-Free Method)
-
Cuff the Bag: Fold the top of the bag down over your hand, creating a wide cuff (like a turtleneck). This keeps the top clean.
-
Use a Glass: Place the bag, tip-down, into a tall glass. Fold the cuffed edges over the rim of the glass. The glass now holds the bag open for you.
-
Fill: Use a spatula to fill the bag with frosting. Do not fill more than 2/3 full. Overfilling makes it hard to control and squeeze and leads to bursts.
-
Uncuff and Seal: Lift the bag out of the glass. Unfold the cuff. Twist the top of the bag firmly to push the frosting down and eliminate air pockets. The twisted part acts as your seal.
Step 4: How to Hold a Piping Bag Correctly
- Grip: Hold the twisted top firmly in the palm of your dominant hand, using your thumb and forefinger to guide and apply pressure.
-
Guide: Use your other hand to gently guide the tip of the bag, like a pencil.
-
Pressure: Apply steady, even pressure with the hand holding the twist. Stop pressure before you lift the bag away to create a clean finish.

5 Common Piping Techniques for Beginners
-
Dots: Hold the bag 90° perpendicular to the surface. Apply pressure, stop, and lift straight up.
-
Lines: Hold the bag at a 45° angle. Apply steady pressure and move your hand in a straight line. Stop pressure, then lift.
-
Shell Border: Use a star tip. Hold at 45°. Squeeze, letting the frosting fan out, then slowly pull the tip down and reduce pressure to create a tail.
-
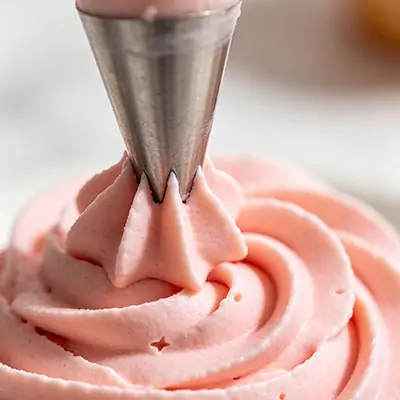
Rosette: Use a star tip. Hold at 90°. Start in the center and pipe in a tight spiral, ending back in the center. Stop pressure and pull away.
-
Writing: Use a small round tip. Thin your frosting slightly for smoother flow. Practice on parchment paper first!
Pro Tips and Tricks
-
Practice with Cheap Stuff: Use leftover mashed potatoes, cheap buttercream, or even toothpaste to practice without waste.
-
Consistency is Key: Frosting that’s too runny will droop; too stiff is hard to squeeze. Aim for “medium peaks.”
-
Keep it Cool: If your hands are warm, the frosting can melt. Take breaks or run your hands under cold water.
-
No Air Bubbles: After filling, gently squeeze the bag over a bowl until a smooth flow of frosting comes out, pushing any air bubbles out first.
How to Clean Reusable Piping Bags
-
Disposable Bags: Simply discard. Snip off the tip to salvage any leftover frosting first.
-
Reusable Bags & Tips: Turn bags inside out and wash with hot, soapy water. Use a special piping tip brush to clean every groove of the tips. Dry thoroughly before storing to prevent rust and bacteria.
Common Problems & Fixes
A: Yes! It’s a great beginner hack. Snip a tiny corner off. It won’t be as precise or sturdy, but it works for simple tasks.
A: You’re overfilled or didn’t twist tightly. Never fill more than 2/3, and ensure a firm twist seal.
A: A large open star tip (like Wilton 1M or 2D). It’s forgiving and creates beautiful rosettes and swirls with minimal skill.